Where Turnout Time Actually Starts
Turnout time runs from the station alert to the moment the departing vehicle clears the apparatus bay door. Of everything in the wider response chain, this is the stretch the building controls: the road, the traffic and the incident itself belong somewhere else.
Inside that stretch sits the dormitory layout, and it spends seconds before a crew reaches the bay at all. Bunk placement, corridor width, door swing, stair location and the straight-line distance from the sleeping zone to the bay door are clock items, not comfort items. Each is a fixed number of steps a half-awake crew takes at 02:00.
For a business owner paying for a station, those seconds are not a training problem to be drilled away. They are an operating cost and an asset-planning cost. A layout that adds fifteen seconds to every turnout erodes the protection level you are paying for, year after year. Training changes behaviour; drawings change distance, and the clock counts distance.
The sections below follow the route from mattress to bay and mark where the seconds go, and which layout decisions give them back.
For teams sizing new or expanded facilities, this industrial bay depth and sizing guide pairs well with the dormitory-side analysis below.
The zones stack up like this, from the moment a crew member leaves the mattress to the moment boots cross the bay threshold. The ranking is lopsided: gear access costs roughly 22 seconds, while the bay threshold costs 4.

Corridor Geometry and Door Hardware: Seconds Hidden in Plain Sight
Most turnout time studies stop at the bunk room door. The route between the mattress and the rig is a sequence of small frictions, and each one charges rent in seconds. A corridor of 1.2 m instead of 1.8 m forces a half-dressed crew into single file, and a passing encounter costs two to four seconds every time. Dead-end runs and unnecessary doglegs add three to six seconds in the dark, when lighting is low and crews are running on reflex rather than vision. Treat that path as a design element, not as leftover floor area.
Door hardware is where the details quietly fail or succeed. A door hinged against the direction of travel must be pulled open with a gloved hand, which costs one to three seconds per door. Round knobs are worse than levers once dexterity is gone. Self-closing doors without hold-opens do the most damage at shift change: a door that swings shut behind a crew moving in convoy adds four to eight seconds of re-opening. Raised thresholds of 20 mm catch a boot heel and cause a stutter step that reads as nothing on a drawing and everything on a stopwatch.
| Element | Typical measured delay | Why it costs time |
|---|---|---|
| Corridor 1.2 m instead of 1.8 m | 2 to 4 s per crew pass | Gear-laden crew forced into single file |
| Extra 8 m of dead-end corridor | 3 to 6 s | Travel in low light, unfamiliar at night |
| Door hinged against travel direction | 1 to 3 s per door | Pull to open instead of push |
| Round knob instead of lever latch | 0.5 to 2 s | Glove dexterity loss |
| Self-closer with no hold-open | 4 to 8 s | Door re-closes mid-convoy |
| Raised threshold, 20 mm | 1 to 2 s | Foot catch and recovery step |
| Full flight of stairs | 8 to 15 s | Descent in boots while carrying PPE |
Vertical Transitions and the Compartmentation Trade-Off
Stairs are the most expensive single element on the route. A single-level apparatus bay access path, where bunk rooms, turnout gear and the bay share one elevation, routinely saves eight to fifteen seconds over a full flight. The number grows when crews are carrying helmets and coats, and it grows again when the stair is open rather than enclosed.
That saving has to be weighed against privacy and code-driven compartmentation. Separating sleeping quarters from the bay with doors and a level change buys acoustic and contaminant isolation, and it should not be given up casually. The practical middle ground is to keep the compartmentation and remove the friction inside it: hold-open hardware on the main run, lever latches throughout, flush thresholds, and a straight corridor with width to spare. Where a level change is unavoidable, a short ramp or one shallow step beats a full flight.
Each item on the list is small. Stacked together, corridor geometry and hardware decisions add roughly twenty to forty seconds to turnout time before anyone touches a rig. Pair this with sound bay planning, including apparatus bay depth sizing and apparatus bay drainage planning, and the response path starts working with the crew instead of against it.
Comparing Dormitory Layout Models
Before committing to a footprint, it helps to see how the three common models trade speed against privacy, acoustics and staffing flexibility.
| Layout model | Bed-to-bay path length | Door interfaces | Privacy level | Acoustic separation | Alerting coverage | Staffing flexibility | Typical turnout seconds lost |
|---|---|---|---|---|---|---|---|
| Linear corridor with compartmented bunk rooms | Long, 40-70 m | 3 to 4 | High (private rooms) | Good (walls to slab) | Full, but multiple doors to clear | Low, fixed room count | 15-30 s |
| Open-bay dormitory adjacent to the bay | Very short, 10-20 m | 1 to 2 | None (shared bay) | Poor (open volume) | Partial, noise wakes whole crew | High, beds added freely | 0-10 s |
| Split-wing with dedicated turnout corridor | Medium, 25-40 m | 1 (direct to corridor) | Medium (curtained or shared) | Very good (separated wing) | Full, single exit path | Medium, wing can be zoned | 5-15 s |
Caption: All three models sit on the same trade-off curve. The fastest bed-to-bay path usually costs privacy and acoustic separation, which is the balance owners have to settle when they choose a fire station dormitory layout for a new build or a renovation.
Reading the Table in Practice
Treat the seconds column as a range, not a promise. A long corridor costs time in every direction, including the return trip. An open bay saves seconds but can wake the whole shift and push fatigue onto the next call. The split-wing sits between them and usually wins where a station runs mixed crews or expects to add staffing later.
Whichever model you pick, the dormitory decision only pays off if the bay side supports it. Owners sizing turning circles and apron depths should review this apparatus bay depth sizing guide before locking the floor plan.
Eight items account for most of the avoidable loss on the dormitory side, and none of them is expensive to correct while the plan is still open.
- Bunk orientation facing away from the door: When bunks are turned so a sleeper’s first movement is a blind roll toward a wall, the body has to re-orient before it can start moving, and that half-second repeats on every call.
- Gear stored off the exit path: Turnout gear kept in a locker behind the bunk, across the room, or in a separate equipment room adds a detour and a decision point to every response.
- Narrow corridor pinch points: Corridors squeezed below roughly four feet of clear width make two responders slow down, step aside, or brush past each other in full gear, and the jam forms at exactly the wrong moment.
- Door hardware that needs two hands: Lever or knob sets without a push plate or kick plate force a gloved hand to grip and turn, so crews either stop to work the latch or leave the door swinging behind them.
- Weak night lighting where feet land: Dim path lighting, unlit stair nosings and shadow pools in the corridor slow a crew that is half-awake, because nobody sprints through a space they cannot see.
- Alerting devices mounted away from the bed head: Speakers and strobes on a far wall or above the corridor door extend wake-up latency, since the sound has further to travel and the responder has to locate it before reacting.
- Stair transitions that force a full stop: A landing that requires a direction change, a turn at the bottom, or a door at the stair base turns a run into a shuffle and costs a genuine pause.
- Shared exits crowded with furniture and storage: Couches, chairs and supply shelving near the single dorm exit narrow the usable opening, and crews end up threading a gap instead of moving freely.
If a renovation is on the table, it helps to treat these items alongside the wider building geometry described in this guide to planning apparatus bay depth and approach clearances.

How to read the diagram: the left block is the bunk room, the narrow band is the corridor, the wall gap is the doorway, the stepped block is the stair, and the wide block on the right is the apparatus bay. The single arrow is the turnout route, and the three rings mark the transition points where friction stacks up: the door swing, the stair descent, and the bay threshold.
If you are reworking that last stretch of the route, the industrial fire station bay depth sizing guide covers clear floor and staging decisions that keep the final steps short.
Where the Seconds Are Lost: Alert, Light, and Gear
Alerting has to be redundant and close to the body, not just loud somewhere in the room. A single horn above the door fails the moment a responder sleeps on the far side of the room, rolls onto an ear, or a fan masks the tone. Place a primary station alert plus a secondary device within arm’s reach of the bed head, at pillow height, so the first cue arrives at close range and the second confirms it. Measure audibility at the pillow with doors closed and HVAC running, not in an empty room at midday, and check that strobes are visible from a sleeping position.
Lighting is the second hidden cost. Overhead fluorescents snapping on at full brightness cause glare adaptation loss: the pupils contract hard and the eye needs several seconds before it can see a step, a latch or a boot. Low-level path lighting along the exit route, roughly ankle to knee height and in warm amber or red tones that preserve night vision, keeps the path legible without blinding anyone. Motion-triggered strips that follow the route work better than one bright fixture at the door.
Gear belongs on the exit path, not in a separate turnout room. Walking to a gear room, dressing, then reversing direction adds travel that no amount of practice eliminates. A rack or freestanding set beside the bunk room door, on the natural line to the bay, with boots pre-set and garments oriented to be stepped into and pulled up facing the exit, reduces movement to a single forward flow.
One boundary deserves attention: the wall between dormitory and bay. Keeping that separation tight, with doors closed and exhaust capture working, protects sleepers from diesel soot that would otherwise drift into the living space. There is more on apparatus bay exhaust extraction and on why the source capture point matters as much as the fan.
Get these three elements right and the seconds between alert and bay shrink without anyone running faster.
Measuring Turnout Performance and Verifying Layout Decisions
Most arguments about fire station dormitory layout are settled on opinion: a longer corridor “feels” slow, a wider bunk room “feels” safer. Measurement changes the conversation, because turnout time is not a single number you feel. It is a chain of short intervals you can name, time and defend. Once each link has a stopwatch number attached, layout becomes an engineering question rather than a preference.
1. Segment the turnout interval into named sub-intervals
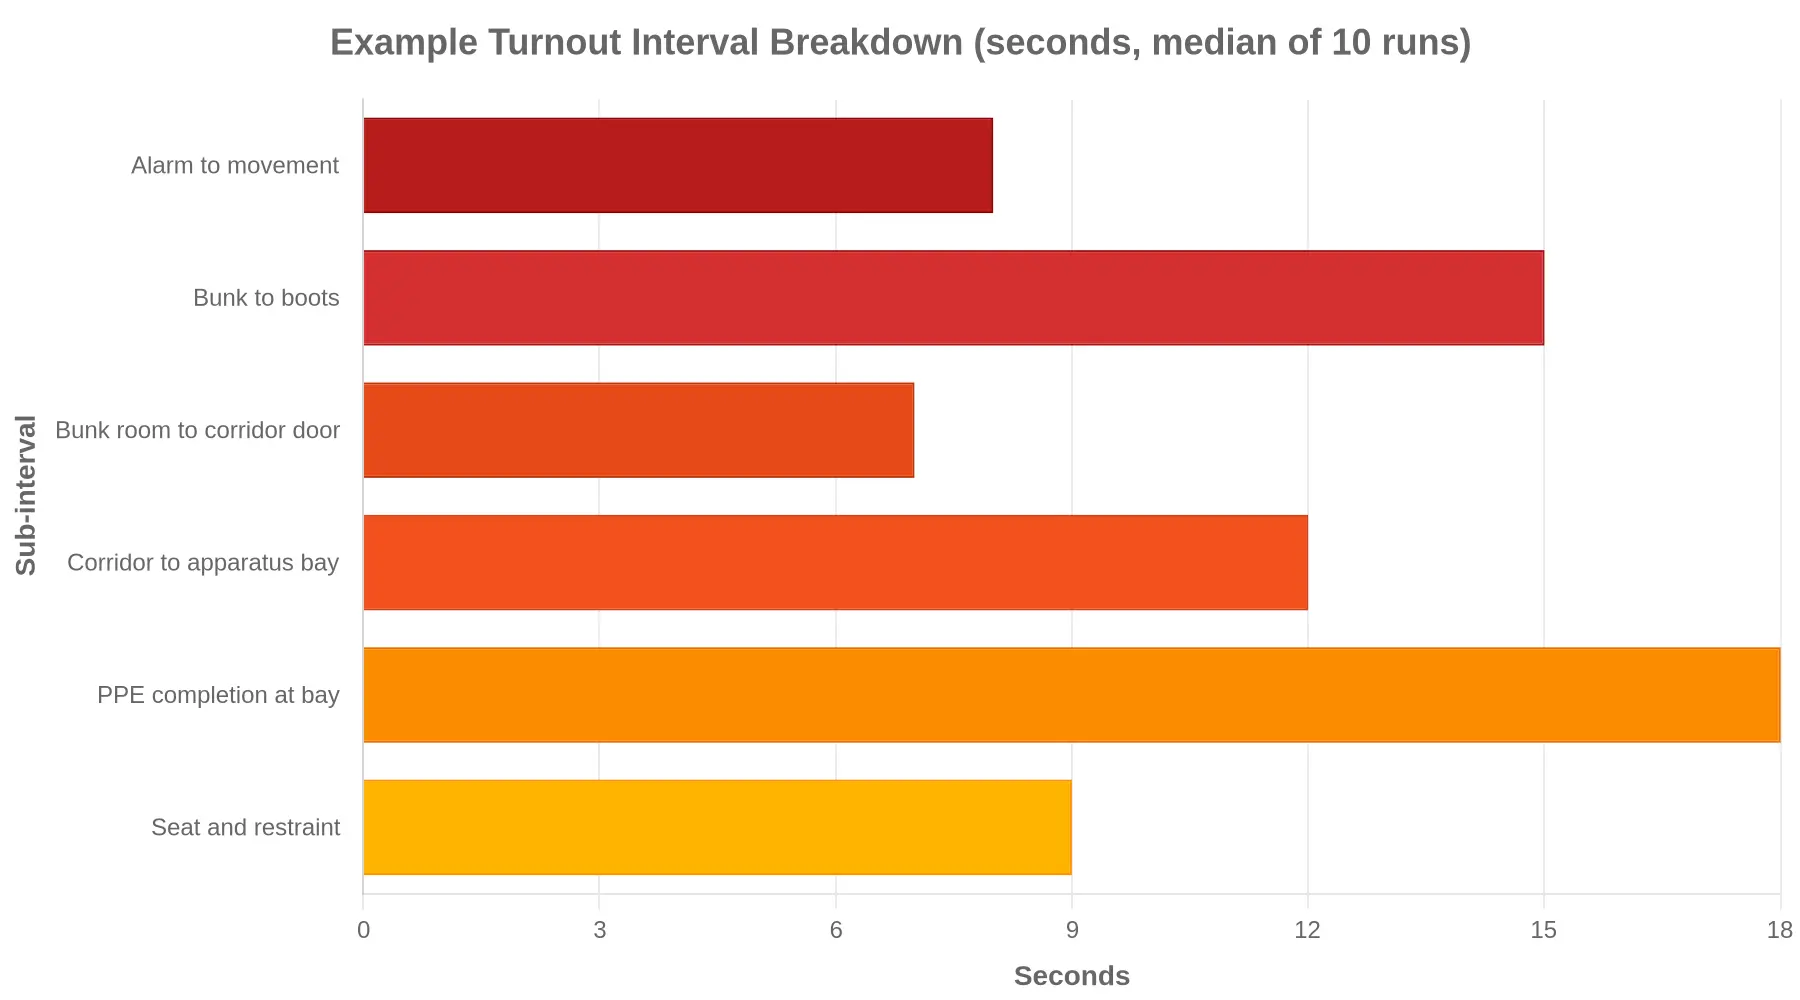
Break the run from alert to seated crew into labelled pieces, and give every piece an owner. Each one tests a specific layout choice, so a bad result points at a design element rather than at “the building.”
| Sub-interval | Layout element it tests | Sample median |
|---|---|---|
| Alarm to movement | Alerting clarity, bunk lighting | 8 s |
| Bunk to boots | Bunk spacing, storage position | 15 s |
| Bunk room to corridor door | Door swing, clearance, thresholds | 7 s |
| Corridor to apparatus bay | Travel distance, corridor width | 12 s |
| PPE completion at bay | PPE staging distance from apparatus | 18 s |
| Seat and restraint | Step-in height, seat access | 9 s |
2. Record repeated timed runs, not one best effort
A single best run tells you what the layout allows on a good night with an alert crew. Ten to twenty runs across several shifts, including night turnovers, tells you what it delivers in practice. Log the median and the spread: a 70-second median with a 25-second spread is a layout problem, because the tail is what shows up on the incident clock. Start every run from the same position, and note obstructions, parked equipment and open doors, since those are layout findings and not crew failings. If bay depth, turning space or clear floor area is uncertain, use a bay depth sizing guide to check whether measured travel distances are being inflated by the building envelope itself.
3. Use the numbers to change or to specify
The conclusion matters more than the measurement. If one sub-interval carries the loss, you can justify a specific change: relocating PPE staging, re-hanging bunk doors, or moving a bunk room wall. If the station is not yet built, the same data becomes procurement language. A response time target can be written as measurable sub-interval limits, and the station-building scope inside a supplier package can be specified against those measured sub-intervals, for example a corridor-to-bay interval under 12 seconds at night. That turns fire station design from a set of drawings into a verified performance requirement, and gives you something to test once crews move in.
Stopwatch data is cheap. Guessing which hallway costs you eight seconds is expensive, every call, for the life of the building.
Frequently Asked Questions
How much turnout time does a fire station dormitory layout typically account for?
The dormitory side of the route, from sleeping position to the apparatus bay, commonly accounts for 20 to 45 seconds of a station’s total turnout time, depending on travel distance, door placement and stair configuration. That figure excludes PPE donning at the rig and apparatus departure. Actual times vary by station and should be measured during drills.
Is an open-bay dormitory always faster?
No. An open bay removes wall and door obstructions but can add group wake-up congestion, privacy conflicts and longer routes in large rooms. A compartmented plan with direct egress can match or beat it. Path length and clear width matter more than the absence of walls.
How does door hardware affect turnout seconds?
Hardware can add one to eight seconds per door through latch operation, swing force and self-closing resistance, with the self-closer usually the largest item. Lever handles and magnetic hold-opens generally clear faster than knobs and high-force closers. Select and adjust hardware so egress takes one motion and no key.
What lighting level supports night turnout without glare?
Use 5 to 10 foot-candles at floor level along the sleeping-to-bay path, with low-glare fixtures and no direct view of the source from the beds. Motion activation and gradual dimming reduce startle and preserve night vision. Save the higher task lighting for the PPE racks rather than spreading it across the whole dormitory.
Can retrofit changes reduce path time in an existing station?
Yes. Removing door stops, relocating PPE racks, adding hold-open devices, marking the shortest route and re-lamping path fixtures all cut seconds without structural work. Measure before and after with timed drills. Retrofits deliver most where the current route has bottlenecks or dark segments.
How should layout requirements be documented when buying a station-building package?
Put measured travel distances, clear door widths, swing direction and hardware, stair dimensions, lighting levels and PPE storage locations on dimensioned drawings. Include a requirement for timed walk-through verification before acceptance. Use the same drawings to confirm the fire station dormitory layout supports the target turnout time, and coordinate bay clearances with this apparatus bay depth sizing guide.
Conclusion: Seconds Before the Bay Are Designed In or Designed Out
The seconds a crew loses before it reaches the apparatus bay are not a matter of discipline or luck. They are set at the dormitory layout stage. A bed placed on the wrong side of a partition, a corridor that fights the natural path to the bay, a gear rack that forces a detour, a door that opens against traffic: none of these appear on a punch list, and all of them tax every response for the life of the building. That is why they belong in the owner’s capital planning cycle, weighed with the same rigour as apparatus selection, rather than deferred to post-occupancy adjustments that cost more and deliver less.
The levers covered here, from sleeping pod orientation through corridor and door geometry, gear storage placement, lighting and alerting, floor transitions and sightlines toward the bay, share one property: they are structural, cheap to get right at design and expensive to fix later.
Integrated station-building planning, developed alongside vehicle, equipment and service decisions, lets layout requirements be specified together instead of discovered piecemeal. Owners who treat them as one package, and who also account for how crews hand off to responding units in response time in mutual aid scenarios, get a station that supports the mission instead of slowing it down.